Optical phenomena and rare lighting effects are some of the coolest things to photograph in the natural world. Witnessing these small moments of magic are some of the most memorable experiences that you can have and they are often over before you can even get your camera out in time! Knowing about, and photographing them, can put a unique spin on your landscape photography, taking it to the next level.
In nearly every case I’ve had no idea what it was until putting in some research later. This study of the science & the mystery can give you an extra layer of appreciation of what you have been lucky enough to see and enable you to be more ready for these events in future. Knowing when and where they are likely to occur and under what weather conditions can inform your decisions as a landscape photographer going forward.
Some of the optical phenomena that I will explain in further detail below include brocken spectres, coronas, iridescence, halos, rainbows, crepuscular & anti crepuscular rays, as well as the earth shadow and its accompanying belt of venus. There are many more so I will update and expand on the information in the future as well as get into some of the night time optical phenomena too.
Brocken Spectre
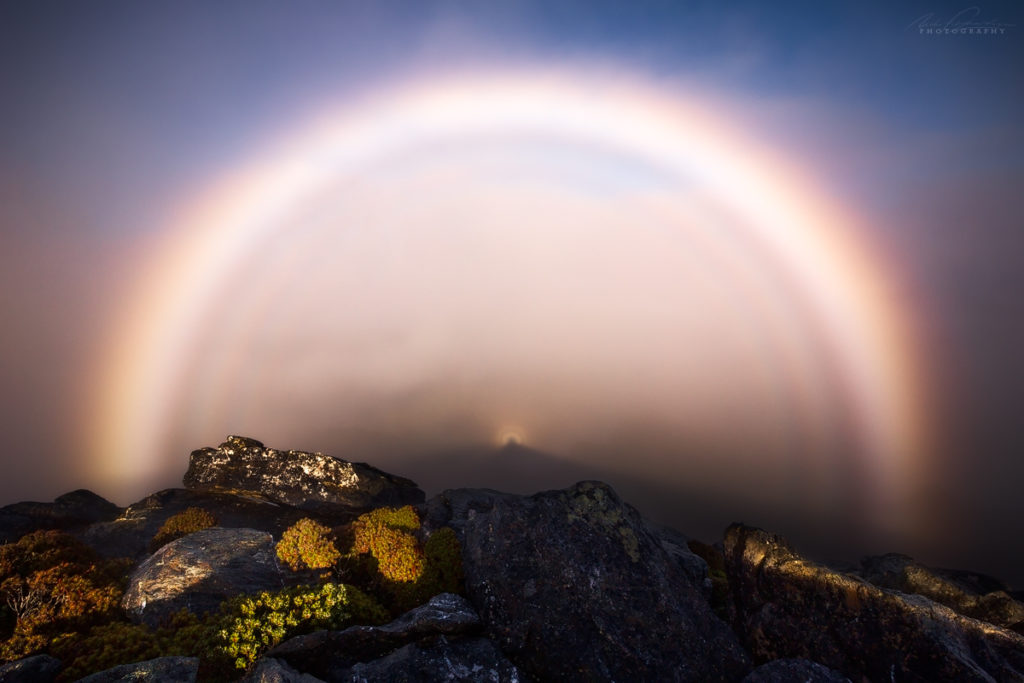
A Brocken Spectre (also known as a ‘glory’, ‘mountain spectre’, or ‘anticorona’) is where the shadow of the observer is projected out by the sun onto the clouds in the opposite direction. It’s characterized by coloured circular rings with the persons shadow which has been magnified in the centre of them. It’s often seen high up in the mountains during misty conditions where the observer can look down onto the mist. The name Brocken comes from the Harz Mountains in Germany, of which Brocken is the highest peak, and where it was written into local legend.
It can be quite spooky in nature due to the optical illusions accompanying it. Your shadow can appear to move because of the movement of the cloud layers and your depth perception is thrown off due to the shadow falling on water droplets that are at varying distances from the eye, sometimes magnifying your shadows size.
An experience with a Brocken Spectre
This is quite rare and something that wont be forgotten quickly. The photo above actually kick started my craze with interesting atmospheric phenomena. I had reached the remote summit of Mt Sirius in The Western Arthurs in Tasmania which had been covered in cloud the whole day. Continuing on toward the top of this peak it turned out just the final 10 metres, the summit block, was above cloud and I was greeted with this heart pounding sight. The image received an honorable mention in The Windland Smith Rice Awards in 2015. I’m still unsure of why this particular brocken spectre had a double set of rings with the outer most rings being absolutely gigantic yet my shadows projection within the centre rings being quite small – I suspect its a combination of phenomena.
Corona
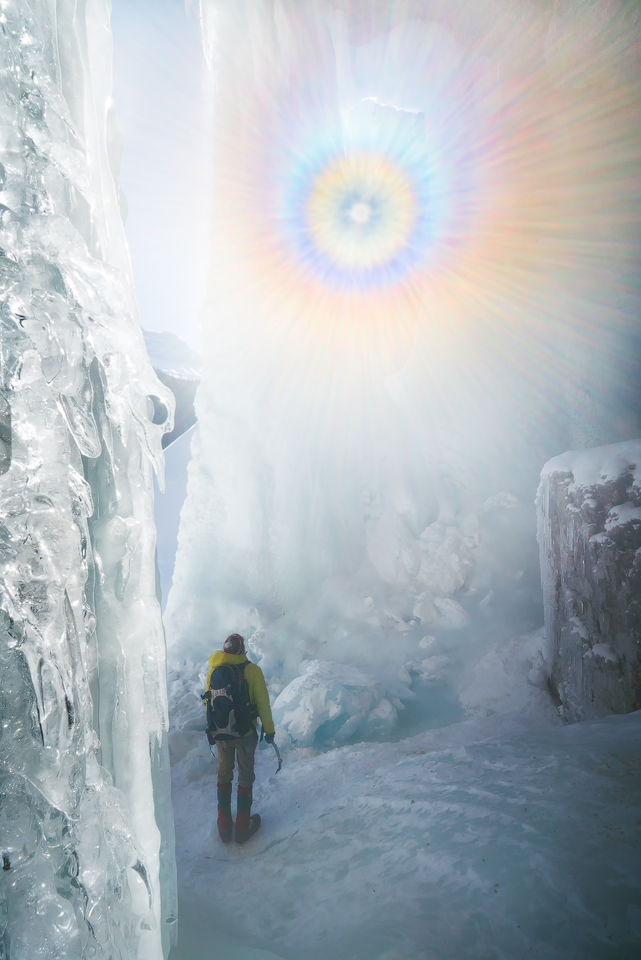
A corona is an optical phenomenon that comes about through diffraction of sunlight (or moonlight) around small water droplets or tiny ice crystals. It is different to the brocken spectre as it occurs at the light source, not in the opposing sky. It is also different than Halos which are formed by refraction of light through larger ice crystals.
Diffraction V’s Refraction
The difference here is that diffraction (causing a corona) is the bending of light around the water/ice crystals, where as the refraction (causing a halo) of light is the change in direction, and quality of light, through the water or ice crystals.
A corona consists of several repeating sequences of colors, or rings, around the sun (or moon). The immediate area around the light source is called the aureole and is usually the only visible part of the corona – appearing as a bluish disc which fades to reddish-brown at its edge. This is why you might get a nice surprise on the back of your camera when you review your photograph as it picks up the rest of the rings/colors! These rings are softly colored (unlike a rainbow which has intense hues) and progressively fainter the further they radiate from the source. It can change rapidly in size and shape as the light bends around varying cloud, mist, water, ice close to the sun (or moon) so fire off as many shots as you can during its appearance.
Caution when photographing Corona!
Take care photographing into sunlight as it can damage your eyes – never look directly at it and be aware it can damage your camera sensor too. A Lunar (moon) corona is a much safer subject! Interestingly looking through an EVF (Electronic Viewfinder) won’t cause your eyes harm like an optical viewfinder will when looking at the sun – but consider that your camera sensor is still being put under a magnifying glass of intense light and it might severely damage it.
Cloud Iridescence
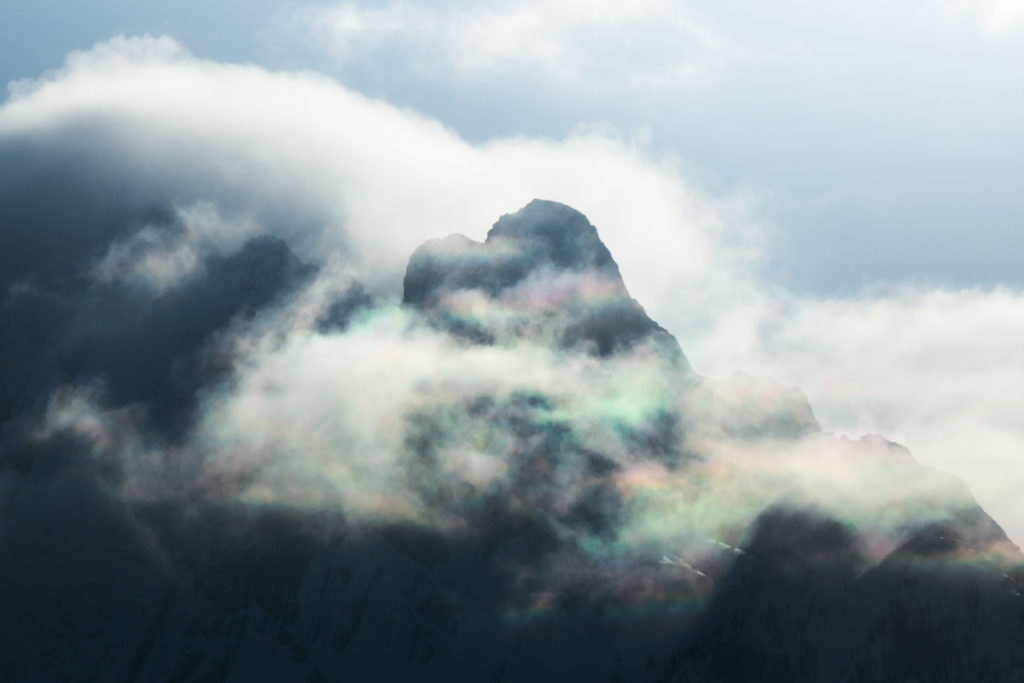
Cloud iridescence (also known as ‘rainbow cloud’ or ‘irisation’) is a colorful optical phenomenon seen in cloud near to the sun (or moon).
Iridescent clouds are a diffraction phenomenon caused by tiny water droplets or ice crystals in the air scattering the light and creating a rainbow-like effect in the clouds. They are vivid, and look like soapy water, taking on an oily appearance, that is pastel in color.
Though the ingredients for rainbow clouds seem simple, they’re not spotted often, and are even less frequently photographed. But why?
Why don’t Iridescent clouds happen more often?
The clouds must be thin and have many uniform water droplets or ice crystals of around the same size. When that occurs the sun (or moon’s) rays of light hit just a few droplets at a time. Therefore newly forming clouds or semi-transparent clouds are the most likely to have iridescence as well as along cloud edges. This is often seen in cloud caps (pileus clouds) which appear above cumulus clouds as they contain that rising moisture and are newly formed – the ideal conditions for iridescence!
How is Iridescence different from a Corona?
When the particles in a thin cloud are very similar in size over a large extent and occur around the sun (or moon) disc, the iridescence takes on the structured form of a Corona, which was described above. They are both from diffracted light around tiny particles of moisture though!
Iridescent Clouds Vs Circumhorizon Arc
Another optical phenomena that can be confused with cloud iridescence is a ‘circumhorizon arc’ which is a band parallel to the horizon. It is rainbow-like too but the colors are instead well organized, red at the top, indigo at the bottom. With cloud iridescence, the colors are more randomly distributed.
For a circumhorizon arc to occur, the sun must be high up, over 58 degrees above the horizon. Iridescence usually occurs close to the sun, which makes it difficult to photograph. A lens hood or using other objects to shield the sun helps when photographing iridescence!
Halo
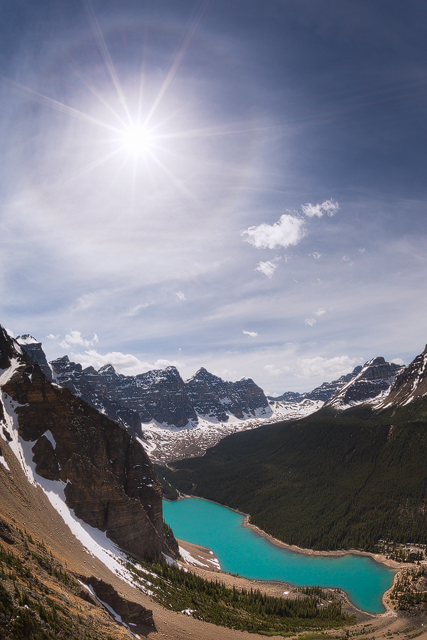
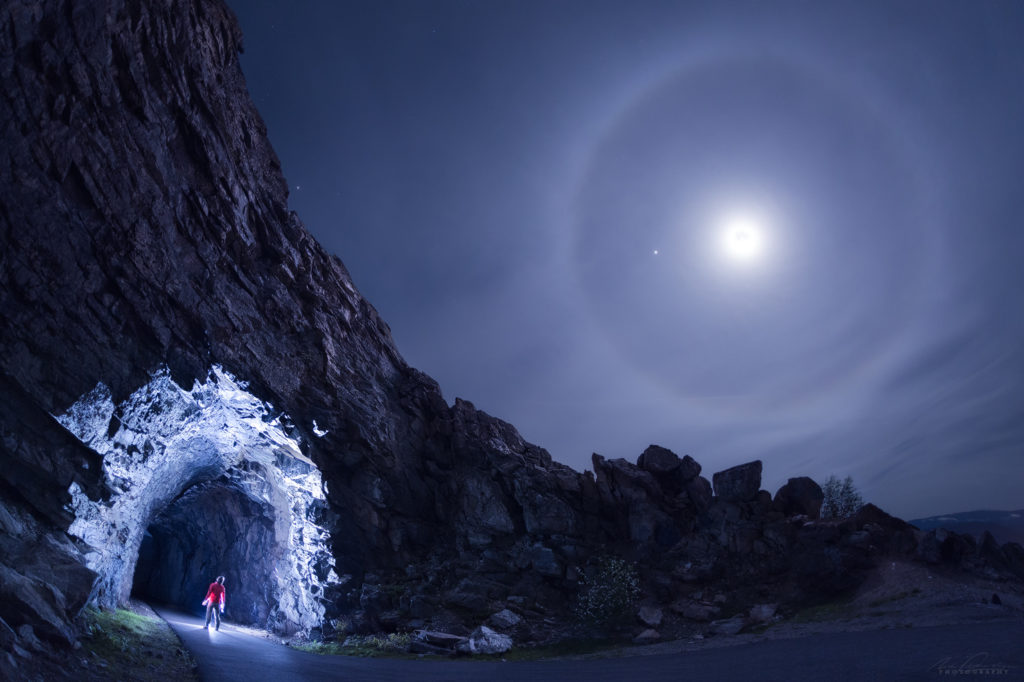
Halos (also called ‘sun dogs’ or ’22 degree halo’) form around the sun or the moon and are optical phenomena made from sunlight (or moonlight) interacting with ice crystals suspended in the atmosphere. They can be white or colored, and can form as arcs, spots or circles in the sky.
You will often need an ultra-wide angle lens or a fisheye to be able to get it all in in just one shot. Both of the halo shots in this post were made with a Sigma Fisheye lens.
The ice crystals that make for halos are larger, are hexagonal, and are usually found in cirrus or cirrostratus clouds – which can actually indicate that precipitation is on the way as those clouds often signify an approaching storm.
Rainbow
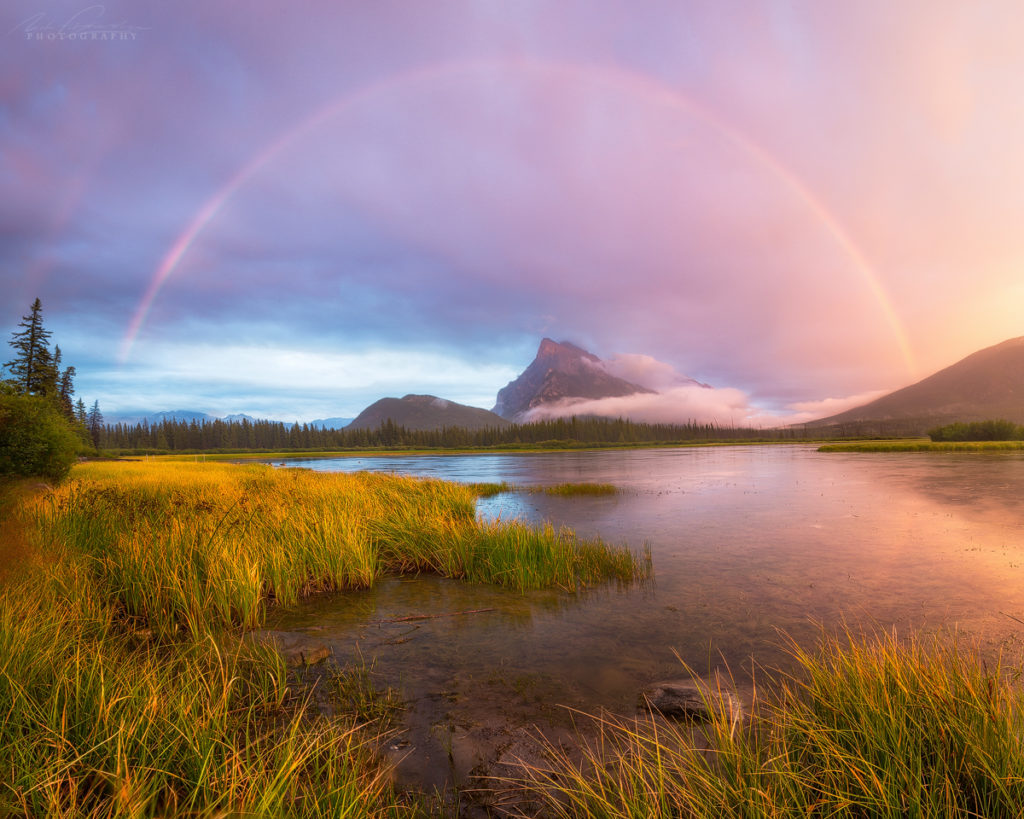
Rainbows are an optical illusion that occur on the opposite side of the sky to the sun so keep an eye out for them during light rainy conditions where it is also clear where the sun is going down (or coming up). Clearing storms are the best so you get a dark background to contrast with the rainbow. They are more common than some of the other phenomena here but you still have to move fast when the conditions materialize and search for a composition that can complement the rainbow.
Rainbows occur at a set angle, which is 40 to 42 degrees. This is complex to explain as they are a product of reflection, refraction and dispersion of light in water droplets but for photography purposes your largest rainbows will be occurring right at sunset or sunrise and will progressively diminish in size towards the middle of the day when they are more likely to appear at your feet.
The rainbow is made up of a whole continuum of colors from red (on the outside) to violet (on the inside) and even beyond the colors that the eye can see although traditionally it is said to have 7 colors – red, orange, yellow, green, blue, indigo, and violet.
Make sure to carry a small pack towel or rain cover for your camera around with you, you will likely get wet for the shot. I like the towel option, I just use it to cover the top of the camera and shoot from underneath it – quick and easy and you can wipe off anything that makes its way onto the camera. If you shoot on a professional grade DSLR you can probably just shoot in the rain without a worry – I have often with my Canon 5d Mark III.
The Double Rainbow!
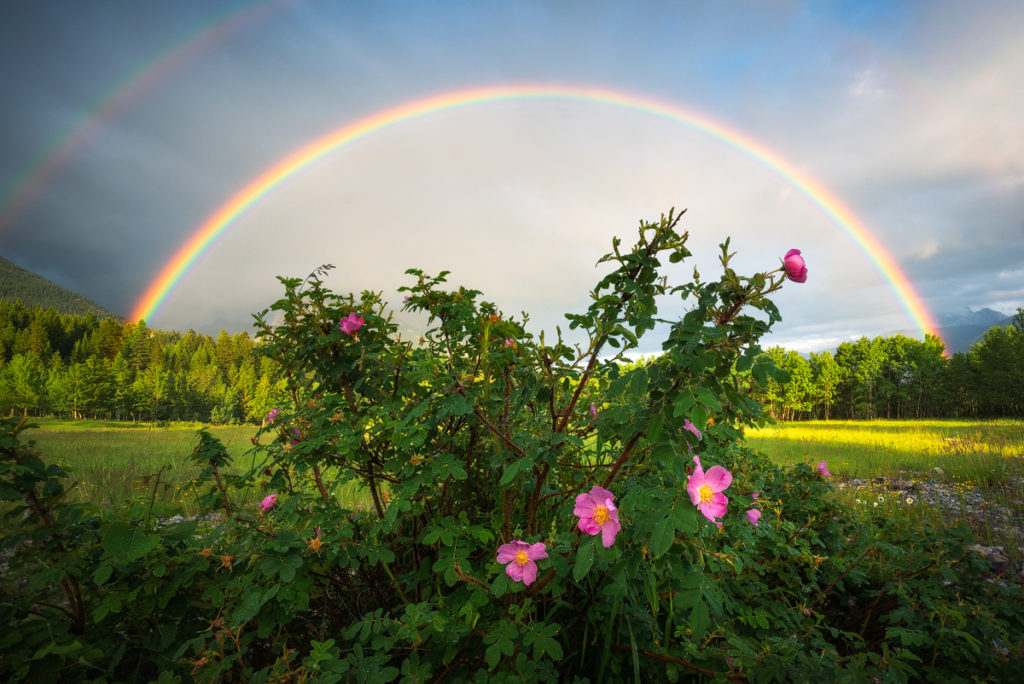
A double rainbow occurs outside of the primary arc at an angle of 50-53 degrees and is a product of double reflection of light inside a water droplet before leaving it. Again very complex, but if you get a visible one, rejoice! The colors are reversed in comparison to the primary rainbow and it appears fainter because more light has escaped during the reflections within the water droplet.
You might need to practice panoramic stitching of frames in order to get the whole rainbow (and double rainbow) in. Make sure to heavily overlap your frames – more than 25% overlap – to make life easier. Also, zooming in a bit if you are on an ultra-wide angle lens before beginning the ‘sweep’ of frames will help the stitch as you will have less distortion to deal with and an easier time stitching the files in Photoshop.
Each rainbow reflects white light inside its colored bands, but that is “down” for the primary and “up” for the secondary rainbow. The dark area of sky between the primary and secondary bows is called ‘Alexander’s band’. This is also why the inside of the primary rainbow can be much brighter!
It is possible for light to be reflected more than twice within a raindrop too! Those resulting additional rainbow arcs are hardly ever seen though.
Crepuscular Rays/Anti-crepuscular Rays

Crepuscular rays
These beams of light (also known as ‘god rays’) can be the icing on top, helping to elevate a moment or composition. They are just particles in the sky which are especially evident during hazy days which can more than make up for the lack of clarity on those days. Watch for them in August in the Rockies if any wildfire smoke is in the air. Try to use them in your composition by positioning the rays as ‘connectors’ between elements in the foreground and the background that can then lead the eye how you want it to be led through the scene.
They are often golden in color because they most often occur around twilight and appear to be originating from the sun when the light is piercing through more of the earth’s atmosphere at a lower angle. The longer golden wavelength of light is all that remains after the shorter blue and the green wavelengths are scattered out through Rayleigh scattering.
The appearance of a convergence in the rays towards the light source is just an illusion, just like a railway line receding into the distance. They are actually just parallel shafts of sunlit and shaded particles. You can not only watch for them at the horizon, but also beaming off mountain peaks or through clouds in mountainous environments like here in the Canadian Rockies. The most famous of these would have to be the beams of light protruding from Mt Rundle’s peaks seen from Vermilion Lakes at sunrise (February and November are good times for that phenomenon as that is when the sun is passing behind the peak from that location at sunrise).
Anti-crepuscular rays
These are light rays (also called ‘Devils Rays’), scattered by dust and haze that appear to converge toward the “antisolar” point, (the location on the horizon opposite the point where the sun is setting). These rays originate at the sun, cross over the sky to the opposite horizon, and appear to converge toward the antisolar point because of perspective.
These rays appear dimmer because they are a product of back scattering not the forward scattering of light seen in the crepuscular rays. They can actually connect across the whole sky too in rare cases!
I’ve only ever seen these twice, and the first time was in Iceland when I just happened to be discussing that I had never seen them before! It is hard to comprehend them because its like the crepuscular god-rays only on the opposite side of the sky to the sun so it doesn’t seem possible! Its a real optical phenomenon.
The Belt of Venus/Earth shadow
The Belt of Venus
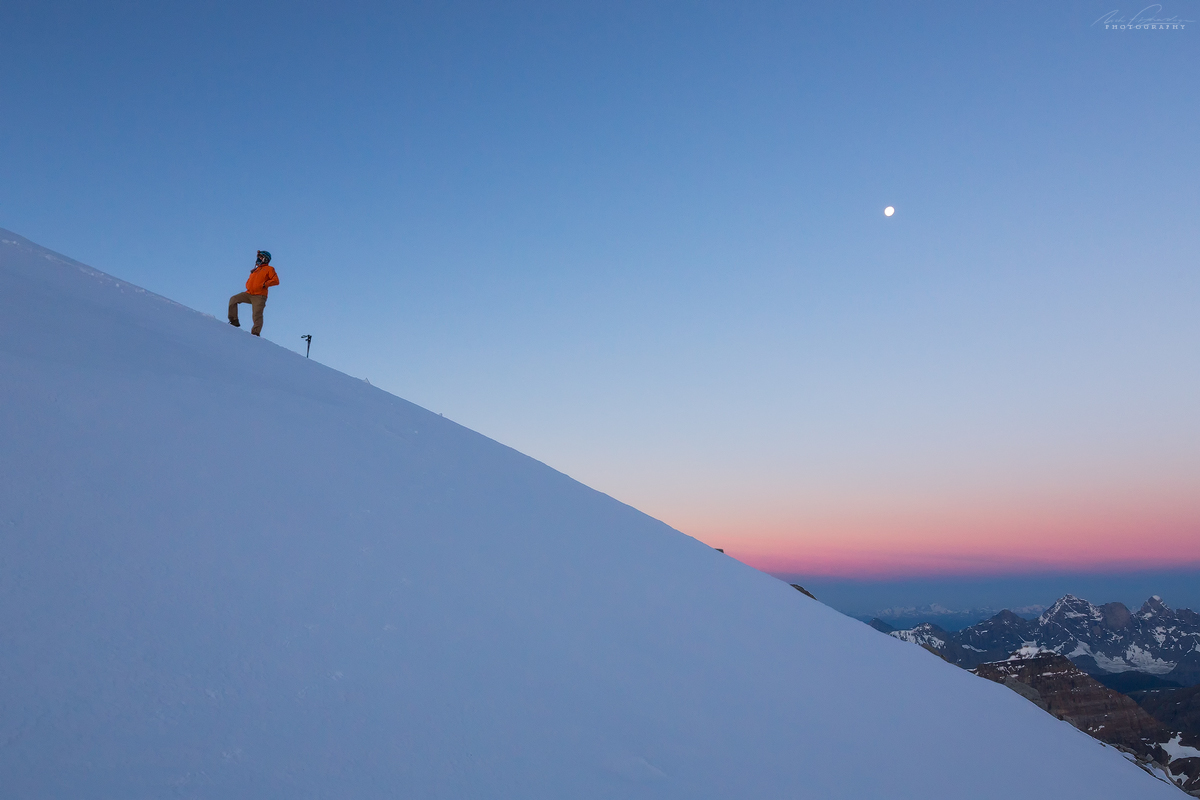
The Belt of Venus (also known as the antitwilight arch) is an atmospheric phenomenon seen shortly after sunset, or shortly before sunrise – in the opposite side of the sky to the sun. It is a pinkish glow just visible above a clear horizon (10-20 degrees) and can be seen anywhere in the world.
It is caused by fine dust particles that are suspended in the atmosphere which the sun’s light is then refracting off of. This light is pinky-red because of the scattering of red light as the sun passes through more of that atmospheric dust and haze at these times of day with the lower angled sun.
The band of red light is only visible because the observer’s line of sight is approximately parallel to the upper edge of Earth’s shadow. It can persist for quite some time, even up to 15 minutes, which is related to the extent of the dust particles and as time passes it lifts up off the horizon and appears to arch, which is the shadow of the curved earth coming into play. It eventually moves beyond visibility as the sun lowers even further beneath the horizon and the earth shadow takes over your line of sight.
The full moon and the Belt of Venus – be ready!
For photography purposes its interesting to note the moon is always full when its within the Belt of Venus because when a full moon occurs its in the sky opposite to where the sun is when it rises/sets. This makes for a very photogenic combination – a red band – with a full moon close to the horizon/mountains! The best one of these I ever saw was right above Lake Louise pre-sunrise as the full moon was setting against Mt Victoria. It looked absurdly fake but it was 100% real due to the physics of light! Guess what, I didn’t have the camera – but its a totally repeatable shot now that you know what to look for!
What does Venus have to do with the Belt of Venus?
Some people say that the planet Venus shows up in the Belt of Venus, hence the name. Its impossible because Venus is at its furthest only ever 45 degrees away from the sun where as the Belt of Venus is always 180 degrees away from the sun in relation to us. The name is related to a Greek/Roman goddess and a band that she wore, that’s it.
Earth Shadow
As twilight progresses, the Belt of Venus’ glow is separated from the horizon by the dark band of the Earth’s Shadow (also called the ‘dark segment’) immediately beneath it. It is the shadow of the earth cast onto its own atmosphere and the space beyond.
The shadow appears as a dark blueish to purple band that covers the horizon opposite to the sun. If you are higher up in the mountains for this, that shadow appears sharper and eventually, both Earth’s shadow and the Belt of Venus disappear into the darkness of the night sky.
This list of atmospheric phenomena is not complete by any means. I’m finding new and interesting phenomena to photograph quite regularly. It is another aspect of photography that I enjoy, as it pushes me to continually learn more about the world we live in.
I have left out most of the awesome night time phenomena for now as it will feature in future blogs here! Thanks for reading.
Photography tours in Banff, Canmore & Lake Louise
I offer photography tours in The Canadian Rockies year round to all the best locations in Banff, Canmore and Lake Louise as well as the entire Canadian Rockies! The length of tour varies between 3hrs, 5hrs, 8hrs and on into multi-day itineraries. These can be customized to your needs. We will be chasing the most interesting mountain photography conditions and hopefully we will see some of these optical phenomena along the way! Contact me below for more information.
You could also sign up to my mailing list below to hear about these tours, other workshops, and more interesting information on The Canadian Rockies!


